After saving your market data and information, you will be able to edit it:
- Click “View Market Data” under “Market Data” from the navigation list on the left.
- Search for the dataset that you wish to edit (e.g. 螺纹钢:HRB400 20mm:唐山).
- Click on the edit button under the “Actions” column (represented by a ‘pen and paper’ icon).
- After editing the information, click “Save”.
Adding Additional Market Price Information
If you wish to add additional market prices into an already-created market data, you are able to do so:
- Click “View Market Data” under “Market Data” from the navigation list on the left.
- Search for the dataset that you wish to edit (e.g. 螺纹钢:HRB400 20mm:唐山).
- Click on the edit button under the “Actions” column (represented by a ‘pen and paper’ icon).
- Under Historical Data, click “Add New Market Prices.”
- Add the relevant information into the table to add new market data. Delete the rows if they are not used (highlight the rows by clicking on the header of the row e.g. 1, 2, 3 etc).
- Click “Save”.
Deleting Market Data
If you do not require the Market Data anymore, you will be able to delete it:
- Click “View Market Data” under “Market Data” from the navigation list on the left.
- Search for the dataset that you wish to edit (e.g. 螺纹钢:HRB400 20mm:唐山).
- Click on the “delete” button under the “Actions” column (represented by a ‘bin’ icon).
- If you want your Market Data to be deleted, click on “Yes, delete!” and it would be deleted. Do note that this is an irreversible action.
- If you do not want your Market Data to be deleted, click on “No, cancel!” and it would not be deleted.
Using MAF Cloud’s Quantitative Model
You are able to use MAF Cloud’s quantitative model(s) with the ‘Market Data’ you have just created.
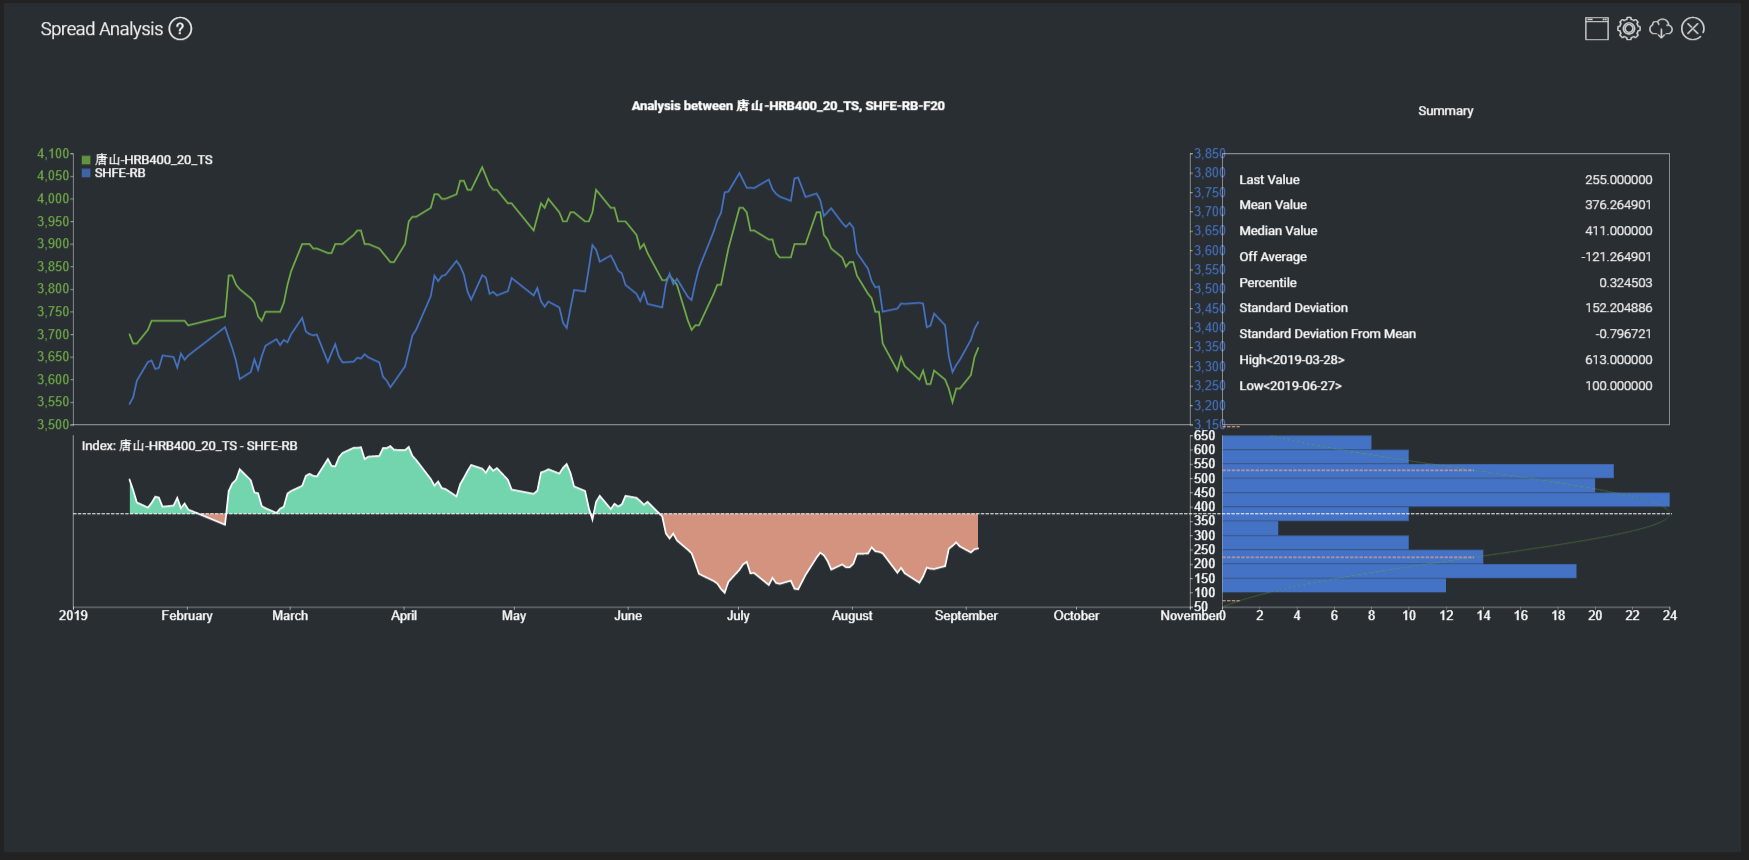
An example would be using the Spread Analysis Model which can be found under “Dashboard” from the navigation list on the left.
Comparing 螺纹钢:HRB400 20mm:唐山 Market Data and Steel Rebar Market Data in the Spread Analysis Model:

Figure 2: Spread Analysis Model
Exporting Data
You would be able to export data from “Historical Data” and from the quantitative models available in MAF Cloud.
Exporting Data from “Historical Data”
- Click “View Market Data” under “Market Data” from the navigation list on the left.
- Search for the data you wish to export.
- Click the “View” button (represented by the ‘eye’ icon).
- Click on “Export Data” from the right corner of the page and you would be able to export this as a .CSV file.
Exporting Data from Quantitative Models
- Select the model you wish to export from your “Dashboard”.
- Click on the export icon (represented by a ‘cloud and arrow’). You will be able to export the data as a .CSV file or as an image.
You are not only able to use the data available in MAF Cloud for quantitative analysis, but will also be able to save and export your own market data for use through this function.
Click here for a detailed step-by-step guide with a sample file for you to try out in MAF Cloud now!

